

I am surprised this hasn't been posted before. It is one of the most common things v2s need and one of the easiest things to do. I would say start to finish is about 1 hour if you go slowly.
If your rear shocks are leaking, making a thud over large bumps, or sagging and dropping over bumps, replace them NOW. I had all of these issues and traction problems. My rear end would want to kick out left or right. Now she drives straight as an arrow and I can actually lay down some power.
Part numbers:
Driver rear - 19302784
Passenger rear - 19302785
I ordered from Jason Guzik at www.newautoparts.com. Great pricing, keeps them in stock, and ships FAST.
I documented replacing the driver rear shock, but I did replace both. The same process goes for the passenger side. I added pictures, but honestly, you don't need them it is that simple.
Tools needs:
-jack
-jack stands
-tire iron
-1/2 drive
-13/16 1/2 socket
-15mm 1/2 socket
-3/8 drive
-10mm 3/8 socket
-13mm 3/8 socket
-needle nose pliers
1. Break loose lug nuts with tire iron.
2. Jack the rear end up and put it on jack stands.
3. Remove wheel.
4. Open trunk and unbolt the 4 10mm nuts securing the upper portion of the rear seat.
![Image]()
5. Open rear doors and remove lower portion of the rear seat.
It is snapped in place by two clips, one in front of each seat. Gently pull up and it will unclip and you can pull it out and set it aside.
![Image]()
6. Unbolt the 4 15mm nuts holding the bottom of the upper portion of the rear seat in place. Then remove the driver side and passenger side seat belt straps from their guides on the upper portion of the rear seat and pull the upper portion forward. I left it in place, but you could wiggle it out if you needed. There will be more than enough room with it leaning forward.
![Image]()
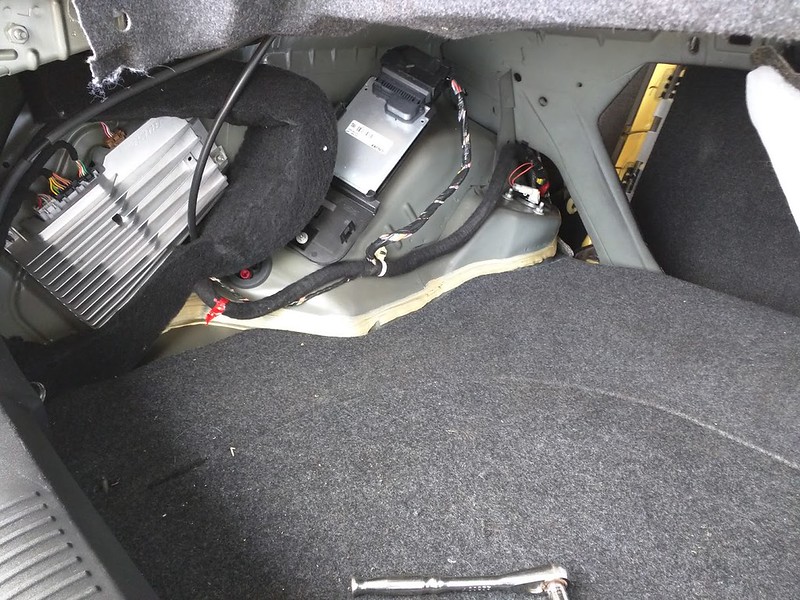
7. Now remove the trunk trim. It is held on by a few plastic snaps and the trunk net mount in the trunk and 2 wide plastic snaps you have to access from the back seat area. You may have to wiggle the trunk latch trim a bit loose to remove the sides of the trunk trim.
![Image]()
![Image]()
8. Place a jack underneath the brake rotor to hold the shock in place.
![Image]()
9. Remove the metal retainer clip that is holding the mag ride sensor plug in place with needle nose pliers. Be very careful NOT to lose this. Carefully tuck the sensor plug out of the way. You can also push it in and remove the connector. I've always preferred to remove the retainer clip and place it aside since they always come off the connectors when I'm doing work.
![Image]()
10. Unbolt the top 3 13mm nuts holding the rear shock in place.
![Image]()
11. Unbolt the 13/16s bolt holding the lower portion of the shock in place. Make sure you remove the BOLT, not the NUT. The NUT is welded in place. The bolt will be towards the front of the car.
![Image]()
12. Lower the jack and slide the rear shock out.
![Image]()
13. Slide the new shock in and jack the rotor up so the shock is in place. I started the lower bolt to steady the shock.
14. Tighten the 3 upper nuts and torque them to 18 ft lbs.
15. Tighten the lower bolt and torque to 111 ft lbs.
16. Put the mag ride sensor back on with the metal retainer clip.
17. Replace the trunk trim.
18. If replacing the other shock, repeat the same steps for the other side.
19. Once done with both shocks and trim in place, put the wheels back on and snug fit the lug nuts.
20. Lower the car and torque the lug nuts to 140 ft lbs.
21. Enjoy how your car SHOULD ride had you not procrastinated purchasing new shocks.
If your rear shocks are leaking, making a thud over large bumps, or sagging and dropping over bumps, replace them NOW. I had all of these issues and traction problems. My rear end would want to kick out left or right. Now she drives straight as an arrow and I can actually lay down some power.
Part numbers:
Driver rear - 19302784
Passenger rear - 19302785
I ordered from Jason Guzik at www.newautoparts.com. Great pricing, keeps them in stock, and ships FAST.
I documented replacing the driver rear shock, but I did replace both. The same process goes for the passenger side. I added pictures, but honestly, you don't need them it is that simple.
Tools needs:
-jack
-jack stands
-tire iron
-1/2 drive
-13/16 1/2 socket
-15mm 1/2 socket
-3/8 drive
-10mm 3/8 socket
-13mm 3/8 socket
-needle nose pliers
1. Break loose lug nuts with tire iron.
2. Jack the rear end up and put it on jack stands.
3. Remove wheel.
4. Open trunk and unbolt the 4 10mm nuts securing the upper portion of the rear seat.

5. Open rear doors and remove lower portion of the rear seat.
It is snapped in place by two clips, one in front of each seat. Gently pull up and it will unclip and you can pull it out and set it aside.

6. Unbolt the 4 15mm nuts holding the bottom of the upper portion of the rear seat in place. Then remove the driver side and passenger side seat belt straps from their guides on the upper portion of the rear seat and pull the upper portion forward. I left it in place, but you could wiggle it out if you needed. There will be more than enough room with it leaning forward.

7. Now remove the trunk trim. It is held on by a few plastic snaps and the trunk net mount in the trunk and 2 wide plastic snaps you have to access from the back seat area. You may have to wiggle the trunk latch trim a bit loose to remove the sides of the trunk trim.

8. Place a jack underneath the brake rotor to hold the shock in place.

9. Remove the metal retainer clip that is holding the mag ride sensor plug in place with needle nose pliers. Be very careful NOT to lose this. Carefully tuck the sensor plug out of the way. You can also push it in and remove the connector. I've always preferred to remove the retainer clip and place it aside since they always come off the connectors when I'm doing work.

10. Unbolt the top 3 13mm nuts holding the rear shock in place.

11. Unbolt the 13/16s bolt holding the lower portion of the shock in place. Make sure you remove the BOLT, not the NUT. The NUT is welded in place. The bolt will be towards the front of the car.

12. Lower the jack and slide the rear shock out.

13. Slide the new shock in and jack the rotor up so the shock is in place. I started the lower bolt to steady the shock.
14. Tighten the 3 upper nuts and torque them to 18 ft lbs.
15. Tighten the lower bolt and torque to 111 ft lbs.
16. Put the mag ride sensor back on with the metal retainer clip.
17. Replace the trunk trim.
18. If replacing the other shock, repeat the same steps for the other side.
19. Once done with both shocks and trim in place, put the wheels back on and snug fit the lug nuts.
20. Lower the car and torque the lug nuts to 140 ft lbs.
21. Enjoy how your car SHOULD ride had you not procrastinated purchasing new shocks.
") Thanks,
Thanks,

